

Cart
You have no items in your shopping cart
Shooting at night can seem daunting when you don’t have experience. We’re here to tell you it isn’t as hard as you think, and here’s how you can get started. If you’re reading this, you’ve probably been oohing and aahing at other peoples’ night photos, wishing you had the skill to create images like that. Photography can be highly technical. This is where a lot of people become intimidated and don’t end up trying the things they’ve always wanted to try. Well, it’s also mathematical, which makes it predictable. There’s a lot of numbers involved in night photography, but don’t be scared if you’re not a math wiz, we all have calculators these days. I’ll go over tips for both analog and digital night shooting. But first, some basic supplies you need:

Tripod
Shutter release/ intervalometer
Spot meter
Flashlight
Hand warmers (not for your hands)
And a couple of basic rules:
Pay attention to the moon, where is it located that night, how full is it, etc. If you’re doing long exposures, you don’t want to be facing the moon or have a full moon lighting up your subject too much.
Shoot in manual or bulb mode. There are no auto modes that will give you good results at night. You must use bulb for long exposures.

Why do you need a tripod? Most people only have steady enough hands to get a clear picture using a shutter speed of 1/60th or higher. Some people are good even down to 1/15th, but unless you’re a robot, you won’t be able to hold the camera still enough for longer exposures. The tripod will be able to.
Tripods come in a variety of sizes, weights, and materials. Choose one that best suits your needs. You may want one that is lightweight so you can go hiking with it. You may want one that is heavier and more steady in the wind. I tend to recommend carbon fiber because it is lightweight but also very strong. It’s rather expensive though so if you can’t afford it you can start with a solid aluminum tripod. I would not recommend using a plastic one for night photography.
There are different kinds of tripod heads (ball head, fluid head, panning head). Most still photographers prefer a good ball head. These are what you see in the image on the right. Ball heads allow you to put your camera at any angle and are super easy to use. They are also usually compact and not too heavy.
What does a shutter release do? A shutter release/cable release allows you to trigger the shutter without touching the camera. Remember that anything that could possibly make the camera move, even a little bit, will blur your photo when you’re creating a long exposure. You can get just a standard cable release, or an intervalometer. I’ll discuss intervalometers later.

Do I need a spot meter? Only in certain situations. For instance, the image to the right was spot metered for the neon signs. This means the meter took a proper exposure for the main subject (neon signs) and I set my time accordingly. This way the detail on my main subject doesn’t get lost.
Don’t forget a flashlight! Don’t forget a flashlight! I know it’s sounds silly but there have been way too times where I’ve gone out to a shoot in the middle of nowhere and forgotten a flashlight. It makes it difficult to find your gear and set it up, especially when it’s all black inside a black camera bag.
Why hand warmers? While your more than welcome to have some around to keep your hands warm, that’s not why I mentioned them here. Hand warmers are actually a super neat trick for keeping your lenses from fogging. When you’re shooting on a cold night, your lenses could gather condensation or moisture while sitting out for a while. It’s very frustrating when you’ve waited an hour for your photo in the cold and realize that it will be nothing but a blur. Just stick one around the lens with a rubber band. Easy peasy.
Digital Night Photography
With modern digital cameras, shooting with almost no light has become a breeze. The newest image sensors have become so sensitive to light that you can shoot hand held with nothing but a little moonlight.
Digital cameras also use the term ISO, borrowed from the film term which basically means the light sensitivity or “speed” of the film. On digital cameras you still must set an ISO when you are shooting in manual mode. The higher the ISO, the more “noise” you get in the image. Noise is a term for those pesky grainy dots you get all over the photos. It was called grain on film, on a digital image it’s called noise. The newer cameras have gotten better and better at reducing the noise of low light photos, but they’re not perfect…yet.

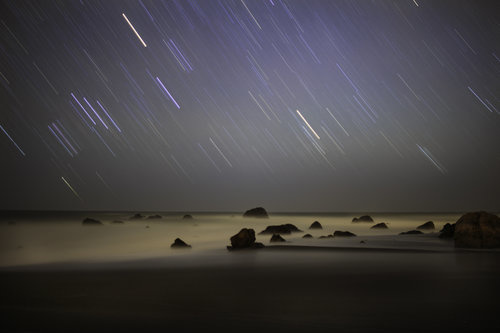
Shot at ISO 100, 20 minute exposure
Want to know how somebody got those stars or make streaks? Or how they got that water to look so soft and velvety? The longer the shutter stays open, the more movement will blur or streak. Keeping your camera still while a subject is moving will create those effects. Hence using a tripod.
On any camera, analog or digital, you need to have a bulb setting. This setting will allow the shutter to stay open from the time you click the shutter button until you release it, however long that may be. An intervalometer will allow you to set a number in seconds, minutes or hours for how long to leave that shutter open in bulb mode. That way, you don’t have to sit there and hold the button down for the whole exposure.
Pushing and Pulling Film
With film there is a way to expand or reduce your ISO after the fact. This is referred to as pushing or pulling. It means that it will be processed as a higher or lower ISO film, and you can request this service from a photo lab. It’s calculated in stops. So, if you are shooting a 400 ISO film, and you want it to be as exposed as a 1600 ISO film, you would set your light meter to 1600 for shooting and then push it 2 stops in processing. ISO 400 is 2 stops aways from ISO 1600. Different films will have different results with pushing and pulling, some better than others. Some films will come out super grainy after being pushed. One of the best currently available films for pushing and pulling is Cinestill. It can be pushed and pulled up to 3 stops with virtually no adverse effects. I regularly shoot the 800t at 3200 (push 2 stops). It comes out crystal clear. I also highly recommend Ilford HP5 for a black and white film that pushes well.
Last but not least:
Learn to see ambient light. Night photography can make you hyper aware of even the smallest source of light. Be aware that any light source will have a large effect on your image. If your main subject is a light source, use a spot meter to measure what your exposure should be on that particular light source.
If you’re feeling overwhelmed by all of this information, remember to just have fun with it! I remember being pleasantly surprised when I first started doing night photos, thinking I wasn’t going to get any results at all. The truth is, as long as your exposure is somewhat within the realm of decent, you’ll have something really cool to work with. It does not have to be even close to perfect. If it comes out a little different than what you expected, you can adjust in post.